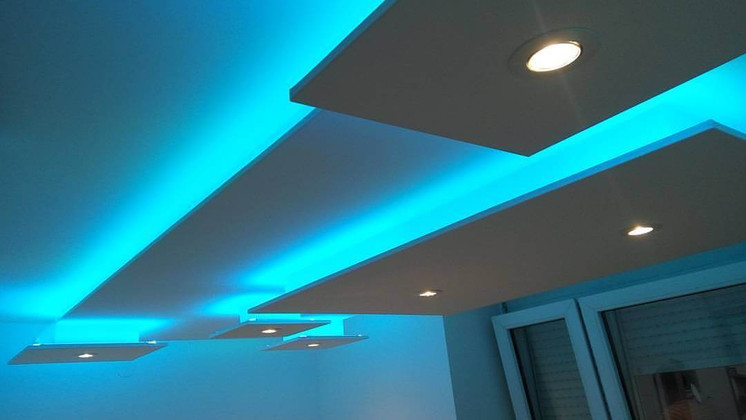
How to Install Ceiling LED Strip Lights
10/20/20
Using light-emitting diode (LED) technology is one of the most energy-efficient ways of lighting your home. In fact, good quality LED lighting boasts a longer life span and uses energy more efficiently than their incandescent counterparts.
Not only that, but LED lighting is an increasingly popular choice in US homes, and that's not excluding ceiling LED strip lights.
If you’ve decided to buy ceiling LED strip lights to enhance your living space, read on for our step-by-step guide to how to install them onto your ceiling. It really doesn’t have to be a complicated process.
Let's dive in!
Plan
There are wide varieties of LED strip lights you can choose, so before diving in, ensure you’re buying the right type of lights at the right length and voltage for your project.
Measure the area you want to cover. We like to advise all our customers to measure twice and cut once. That way, you’ll have a precise idea of how much lighting you need to buy, and you won’t be caught short.
Remember also that by buying the right voltage, you will be able to connect your lights to your power supply with purchased connectors and other compatible accessories so that you get precisely the effect you’re looking for.
Also, unspool your lights, and before cutting them to fit particular sizes, you should test the LED strip light output and color if you’ve chosen color lights. If you don’t do this before fitting your lights to the size, you may lose the right to return them.
Putting Your Lights in Place
All LED strip lights come in a long reel with an adhesive backing that allows you to stick them in place. All you have to do is remove the adhesive covering and then attach the lights on the area(s) of ceiling you want to cover.
You may prefer not to use this kind of sticky backing, so instead, you can opt to use aluminum channels that hold the strip lights in place, and the plastic that comes with them acts as a diffuser for an improved lighting impact.
If you have a drop-ceiling and want to install LED lights, ensure they're placed at the edge of your drop-ceiling behind a lip. The LED tape should be lower than the lip by around 15mm. That way, you get a better lighting effect.
You can either fit the lights vertically or horizontally. If you opt for the latter, place the LED strip as close behind the lop of the drop-ceiling as you can.
Wiring Your Lights
If you’re installing ceiling LED strip lights, you may have a few lengths wired together, so there aren't any gaps where you want to install them. Alternatively, you may have an opening and need to wire a light strip to cover it.
You should see a dotted line mark on your lights. That’s where you can cut them with a pair of sharp scissors or a rope and strip light cutter.
Once cut, place the strips where you want them and solder them with the right extension cable that matches the color of your lights.
Alternatively, use inexpensive connectors instead. These should snap in place at the end of your strips, although bear in mind that if you connect a lot of strips, you may experience a lessening in voltage.
Connect to the Power
Typically, your LED lights will be low voltage, such as 12V or 24V. If that’s the case, you need to avoid wiring them straight into your home electrical circuit because there’s a risk that the LED chips will explode.
Instead, your LED lights should come with a power connector or converter. This is what makes it possible for you to wire your LED lights to your home electrical circuit without blowing the lights.
The power converters have white, black, and bare or green copper wires. These are sometimes also called the neutral, AC line, and protective ground wires, respectively. It’s also worth investing in a power surge protector to protect your strip lights.
Remember that when you connect your lights, they really shouldn’t be left on 24/7. If you do this, you could be decreasing their lifespan and causing them to overheat. Your warranty won’t cover this.
That’s why it’s wise to turn your LED ceiling strip lights off for at least a couple of hours a day.
Controlling Your Lights
So now you’re all powered on and ready to turn your LED ceiling lights on; you still need to ensure that you can control how bright or dim your lights are and whether or not they are sensor activated too.
You can buy on/off dimmer switches that are compatible with your LED lights, and you can plug these in between the strips and their power source so you can choose the level of light you need, night and day.
You may also want to add a neat motion sensor to your ceiling light display that can be wired to your strip lights and detect any movement.
If you’re a tech fan and want something that bit more impressive, you could go one step further and invest in a Wireless (WiFi) Converter for RGB/RGBW Rope & Strip Light Controllers - 12 Volt / 120 Volt.
This cute device will allow you to control your lights from your smartphone or tablet.
Light Up Your Home with Ceiling LED Strip Lights
Ceiling LED strip lights are an easy way of brightening, revitalizing, and smartening up your home without costing the earth. You don’t have to take down ceilings or drill holes, and there’s plenty of advice on our blog about the multiple advantages of strip lights and connectors.
So, if you're interested in adding ceiling LED strip lights to your home, contact us today to get started!


